
How to make paper from plants
Paper is a versatile material that can be used for writing, drawing, and many other things. In this article, we’ll explore the paper-making process and how you can make your own sheets of paper at home.
We will also look at some different ways to use paper in art projects such as making origami or even painting with watercolor.
Making paper is a surprisingly easy process. All you need are some basic materials and a few minutes of time. In this blog post, we will walk through the steps to making your own paper from scratch!
This blog post will cover how to make paper using four different methods: pulping wood chips, boiling cellulose fibers, chemical extraction with sulfuric acid, and mechanical separation with screen printing. We’ll explore each in detail below.
Here are the easy steps to make paper at home in 2021:
- Prepare for Paper-Making
- Shred Some Scrap Paper
- Soak the Scrap Paper
- Blend the Pulp
- Customize the Pulp
- Set up Your Workspace
- Pour the Pulp
- Remove the Screening
- Let the Paper Dry
- Rinse Excess Pulp
STEP 1: Prepare for Paper-Making
In this first step, you will need to prepare for the paper-making process. First, gather all of your materials and tools together in an area that is free from any debris or fibers. You should have a jar with water (enough to cover the material), a container for mixing chemicals, another large jar with water mixed with sulfuric Paper.
STEP 2: Shred Some Scrap Paper
fill the jar with water and add wood chips to it. Stir this mixture until all of the lignin has been dissolved from the chip. After the lignin has been removed, remove all of the pieces from the water and shred them into a pulp.
STEP 3: Soak the Scrap Paper
In this step, you will need to use your large jar to soak the scrap paper in a pulp mixture. This is done by filling it with water mixed with sulfuric acid. You should also add some more of the lignin-removing chemicals and stir everything together until it becomes thick enough that it won’t run Paper.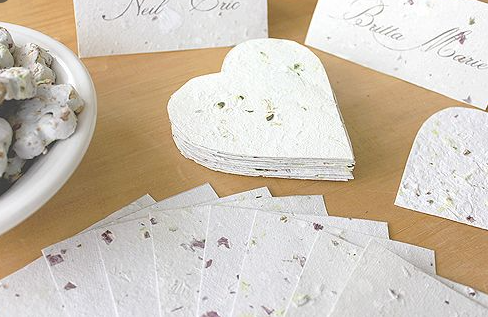
STEP 4: Blend the Pulp
Now you will need to use your blender to blend the pulp. You should do this for at least an hour in order to turn it into a liquid Paper.
STEP 5: Customize the Pulp
Now you will need to pour your liquid pulp into the mold. This is a really important step, because it helps create something that can be turned into paper. You should not fill up the molds too high or they will leak when you try to get them dry Paper.
STEP 6: Set up Your Workspace
The next thing you will need to do is prepare your workspace. You should have a large surface and plenty of space in order to move around while you are making paper.
STEP 7: Pour the Pulp
Pour the pulp into your sheet mold and use a spoon to spread it evenly. If you want straight edges, make sure that the paper goes all the way up to each edge of your screen frame; if not, let some ragged-looking edges remain. Fill in any thin spots with more liquid as needed until there’s enough on both sides for us to get started screening off excess water (don’t worry about getting every last bit out). Once you’re ready – lift! Tilt slightly so we can start leaving those little droplets behind
STEP 8: Remove the Screening
Paper molds can be challenging to use, but with this guide it will become easier. Lay one side of the sheet mold on a dish towel then flip over completely (1). Lift frame from paper and set aside while you flatten out screening by pressing firmly in the center working your way outward towards edges using a sponge(2) Finally remove the screen for drying.
STEP 9: Let the Paper Dry
Hang paper to dry on a clothesline or place it in the oven with just the light turned on. Letting your paper air-dry can take up to 24 hours – but you can speed up drying time by baking it too! Paper dries more evenly when heated because all of its surfaces are exposed at once, so make sure not only is there enough ventilation for this process, but that any materials used don’t catch fire.
STEP 10: Rinse Excess Pulp
Once your paper is dry, remove it from the clothesline or oven and rinse away any excess pulp.
To prepare the mold frame for creating a new sheet, rinse off any clinging pulp and set it aside. Then fill your sink with water so you can wash out each individual screen and make sure there’s no paper sticking to them before beginning work on another fresh batch of sheets. When finished washing everything down, pour all remaining waste products right into your compost pile or garden bed!
STEP 11: Make Petal Paper
There are plenty of ways to use your finished homemade paper. For example, it could be used for notecards, invitations and scrapbooking or as petal paper with a dash of colorful flower petals stirred in before pouring the prepared pulp into an easy-to-use sheet mold (image 1). You can even frame the handmade pad as artwork! To make this type of art out of smaller flowers like roses or tulips tear them up first so that they don’t pop through when you’re done making them on top layer by adding some color onto their surface.
STEP 12: Make Origami Paper
The process of making your own origami paper is almost identical to that which you were just doing, only this time when the pulp starts to set it should be a little thicker. So use less water and stir for about five minutes instead of ten before pouring over sheets! It will not take as long with these lighter weight papers so don’t get too discouraged if they seem delicate or breakable while working with them (image).
STEP 13: Make Paper by Hand
If you have a lot of time to spare, want something more personalized than store-bought paper or just enjoy the process for its own sake, there are various methods that let you make your own paper. One is hand-making it with a paste made from fibers and water (though this can take some experience). Another method involves molding pulp around wire mesh frames in order to create individual sheets at once; then pressing them between boards and drying them out on racks before using these as finished products. If you don’t want to go through this whole process but still need large quantities of material, screen printing onto cotton fabric can provide an alternative –
STEP 12: Make Fragrant Paper
Add a handful of your favorite herbs and flowers to plain or colored pulp, along with some drops of essential oil that will enhance the fragrance.
Blend together fresh leaves and flowers from your favorite herb in plain or colored paper pulp using water if desired- be sure not to overdo it! Add a few drops of essential oils for an even better aroma.
STEP 13: Make Plantable Paper and Collages
Making paper from seeds can be a fun project to do with your kids. All you need is some plain or colored pulp, the type of flowers that will grow in your area (edible for food), and water so you can mix it up before pouring it into the mold. When making plantable paper , stir one spoonful of seeds into whatever color combination you prefer then pour them out onto parchment lined baking sheets . Let these sit overnight at room temperature which should allow time for any remaining moisture -which may have affected quality when printing-to evaporate away. You might want to cover each sheet pan with plastic wrap since humidity could prevent drying completely otherwise .
To make a collage, first lay the wet leaves out on your screening. Then, pour in some prepared pulp and add any flowers or stems you want to use. Carefully spoon more of the mixture over them before it dries to create an interesting design!
Adding seeds or small pieces of plants to your paper will make it plantable!
STEP 14: Make Paper from Post-consumer Waste Materials
Paper can be made out of many post-consumer waste materials such as newspaper, magazines and books. This is a great way to create something new that won’t end up in the landfill after one use.
STEP 15: You’re Ready to Take on the World – Now What?
Making paper doesn’t have to take all day, but with so many different types you might find yourself wanting to see what else this ancient technique has in store for you. I hope these simple steps get you started down an exciting path into designing your own original papers!
How to Make Handmade Paper from Recycled Materials
Supplies for Making Paper:
- Water
- Scrap Papers
- Plastic storage tub or vat
- Kitchen blender – get one from the thrift store
- Mould & Deckle (a screen attached to a frame) How-to make a mould & deckle >
- Wood boards OR sponge & rolling pin
- Towels, wool blankets, cloth, pellon, Sham-wows, or other absorbent material
STEP 1: CUT UP PAPER
When you go to the recycle bin, don’t throw out all of those amazing paper options. Try making your own watercolor papers with any old scrap or junk mail and experiment for yourself. What might seem like trash could be just what you need!
STEP 2: BLEND IT & MAKE A VAT OF PULP
After you have a full tub of paper pulp, use your board or sponge to stretch out the fibers before starting work on screen.
STEP 3: PULL SOME SHEETS
Now, for sheet formation:
- Stir your vat of pulp.
- Hold the mould screen side up, and place the deckle evenly on top.
- Holding them together at a 45-degree angle, dip the mold and deckle to the bottom of the vat and scoop up, holding the mold and deckle horizontally.
- As you lift it out of the slurry, give it a quick shake back and forth, and left to right to align the fibers and make a more uniform sheet. Stop shaking before the sheet is fully drained.
- Let the water drain to a drip.
how to make paper by hand at home
STEP 4: COUCHING (**Pronounced coo-ching. For real.)
Couching is the process of transferring wet fabric onto a flat, absorbent surface. There are many options for couchings surfaces including wool felt (ideal), blankets, towels and pellon among others. When you have your couching materials laid out on top of an appropriate surface such as makeshift table or board with something to hold it in place like cinder blocks – soak them all before starting this step by soaking both sides separately; then lay one side down against its corresponding material so that they’re touching at every point along their edges while leaving space around the corners to avoid wrinkles when tucking them under themselves during drying time. With care taken not to let any water drip off either piece into another’s direction: use two hands.
STEP 5: PRESSING
Option 1: Hand Pressing
Take one of the pieces and press it down firmly with both hands, squeezing out any excess water as you go. Once all the water has been pressed out of that side, take a clean towel or rag and dab up any moisture left on top before flipping to do the other side for pressing. Repeat this process several times until no more water.
Option 2: Board Pressing
Take a sturdy board–wood, cardboard, or even a fabric-wrapped book. Lay the paper’s size on top of this surface and lay another piece out to cover it from below. Once again take care not to let any water drip into each other’s direction: use two hands
Then press down with firm pressure starting at one side.
STEP 6: DRYING
Option 1: Surface Drying (that’s this picture here)
- Find a flat, non-porous surface. Smooth wood boards, plexiglass, windows, and formica surfaces work well.
- Take your wet sheet and gently press onto the flat surface. Make sure the edges are pressed down well.
- Let the paper dry (1-3 days depending on humidity levels and thickness of the paper).
- Peel it off.
Option 2: Exchange Drying
- Get some blotters, towels, or other absorbent, dry, flat material.
- Layer the material and then your wet handmade paper on top.
- Repeat. Create a stack.
- When you’re done, place a wood board or a book on top. Weigh it down with more books or something heavy.
- Check it once every day and exchange the damp material with dry material until your handmade paper is dry.
Option 3: No Restraint Drying
If you want to add some funkiness and personality into your bedding, make a twisted quilt by wrapping an old sheet around the mattress. Once it’s dry, admire how tightly folded wrinkles form interesting shapes on one side of the fabric!
Option 4: Dry on Pellon or Cloth
To hang up the wet paper from your press, peel off a length of pellon and let it stick to the top sheet. Hang this on your clothesline with some space left in between for other items you have drying. Once dry (1-2 days), remove the free end carefully so that you don’t disturb any creases or waves created by pressing!