
Looking for how are dimples formed, benefits of dimples, are dimples attractive, mouth corner dimples astrology, one dimple, chin dimples, how to get dimples, dimples meaning, dimple surgery…Read here.
In the past, these two small holes that can appear when smiling were considered “the fingerprint of God’s finger,” a mark for the luckiest people with divine grace. Subsequently, they evolved into symbols of beauty, vitality or wisdom.
Present in only 20% of the world’s population, dimples are a physical feature that never goes unnoticed. And for good reason, many of us associate them with a beauty asset that is out of the ordinary among those likely to please us. Between celebrities who proudly wear them by being shot by flashes on red carpets, and those who are willing to spend huge sums to get them, it must be said: the dimples are extremely attractive and leave no one indifferent.
Rare, Lucky and Attractive dimples
When dimples are present at birth, they are caused by a malformation of the even muscles ranging from cleft lip to cheekbones. It is essentially the large zygomatic, the Greek zygoma meaning join, which when it contracts, causes a reaction that lifts the corner of the lips upwards and the outside to stretch them towards the ears. According to Dr Ralph Abbou, a plastic surgeon in Paris, the dimples are therefore a kind of “adhesion of the skin with the oral mucosa”, especially between the large zygomatic and the skin of the cheeks.
Therefore, when a person does not have dimples, it represents the absence of adhesion between these parts of the face, a slip between the skin, the mucous membrane and the muscle that does not mark these famous little holes. A “defect” that some people do not hesitate to correct by resorting to plastic surgery.
Dimple Surgery (Meaning, Cost, Before and After)
Coming straight from the United States where its followers number in the thousands, the “dimpleplasty” or “dimpled surgery” rages among millennials. Determined to wear these small holes that characterize celebrities such as Miranda Kerr or Adriana Karembeu, they are willing to pay the cool sum of 680 euros for the smallest budgets, up to 2200 euros for the most advanced interventions.
In France,it is practiced for the modest sum of 1500 euros, for a semi-permanent effect that eventually fades after about 2 months. Namely, this surgery does not only lead to satisfactory results. Dr. Wright Jones, a plastic surgeon in Atlanta, USA, warns of certain risks, such as pain, swelling, deformities, a result that lacks naturalness or even hollows that appear in the wrong places.
Why such enthusiasm for this malformation?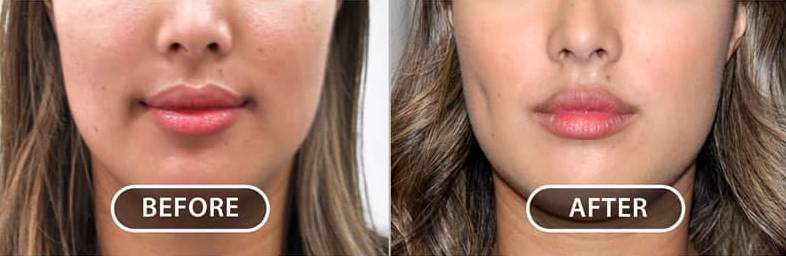
Widely appreciated for their aesthetic appearance, dimples convey different messages depending on the gender of the person who has them. For a woman, dimples are essentially synonymous with beauty and attraction. Recalling innocence and ingenuity, they give a natural charm to the lucky ones who do not fail to wear them proudly.
For men, on the other hand, dimples are more about character than aesthetics, especially when they are present at the chinlevel! Indeed, these little charm holes are not limited only to the cracks of the lips. For some (and some), they are a sign of strength and courage, combined with an increased sense of responsibility. An asset that immediately draws the attention of the female gent on the face of their male counterparts.
What are the Different types of dimples?
There is a tendency to believe that dimples appear only in the hollow of the cheeks or on the chin, yet they are not limited to the facial area of the human body. There is a third, less well-known yet irresistible type: sacroiliac dimples, otherwise known as Venus dimples.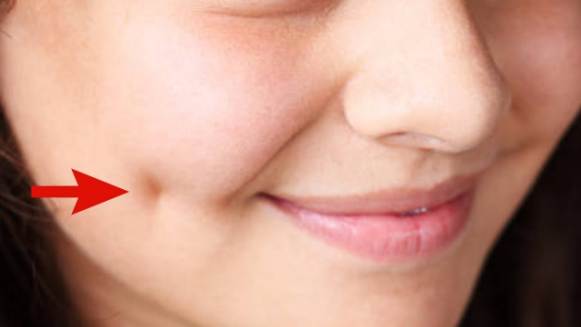
Located in the hollow of the kidneys, they have even given birth to a new trend: the Barbie back. A surgical procedure whose objective is to have a buttock as close as possible to the eponymous idol for a kidney fall worthy of the name. A fad that has not failed to seduce many countries but which has failed to impose itself in France. Indeed, if the look associated with the Mattel doll makes envious across the Atlantic, it seems that the French have decided to pass their turn this time
How to get a Dimple
It is impossible to create real dimples. These are the result of a genetic deficiency that causes the muscles to shorten. So you can only have dimples when you were born with them. However, some exercises and make-up techniques can make you feel like you have dimples. Here are some natural ways to make you look like dimples.
Method 1: Do facial exercises
1. Fold your lips and suck out the cheeks.
Take the expression you would have if you had just eaten a lemon or something particularly sour. You must have your mouth in your heart and your cheeks sucked inwards.
This method is not supported by any medical evidence. It’s just a way to simulate dimples and it’s not at all certain that it works for you.
Your lips should naturally widen and the hollow of your cheeks should rest between your upper and lower teeth, about halfway between your mouth and throat.
In fact, you can try drinking or eating something acid if you have trouble imagining the facial expression in question. Your natural reaction to acidity is what you are looking to do with this exercise.
2. Dig your cheeks
Find the area where your cheeks are most hollowed out. Press this area on both sides of the cheeks using your indexes.
You can also use your thumbs or the rounded end of a pen to press these areas if you find it easier.
3. Smile and reposition your fingers if necessary.
Gradually change the expression of your face with a broad smile, keeping your fingers positioned in the same areas. Your fingers should be positioned near the cracks in your lips. This is where your dimples should be if you had them naturally. You should have a big natural smile, as dimples usually form when you have a bright smile.
Using your fingers or the rounded end of a pen, press the area on which you want to form your dimples. To create temporary dimples, release immediately. You can take a picture to see the result. These dimples will disappear instantly when you stop smiling.
Look at yourself in a mirror. Observe the position of your fingers and if they are not well placed reposition them properly by moving them slightly.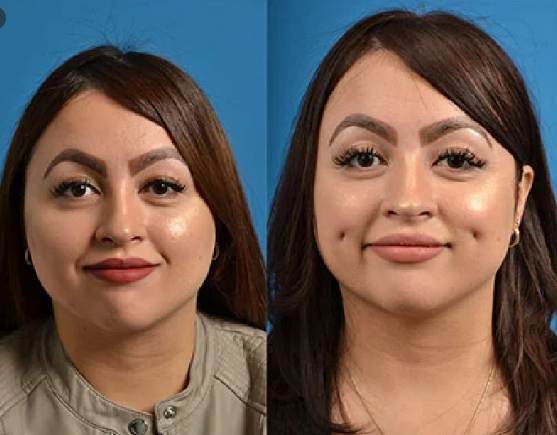
4. Continue pressing for at least 30 minutes.
If you want to get dimples that last longer, you will need to keep your hollowed cheeks firmly for at least 30 minutes.
The longer you hold your “dimples” in place, the more likely they are to last.
There used to be devices that were used to create dimples by applying constant pressure to these areas of the face. But the effectiveness of “dimpled machines” has never been proven, even if some people swear by them. This exercise replicates what these machines were supposed to do.
5. Repeat daily.
Continue to do these 30 minutes of exercise daily for several weeks. If a month goes by without you having managed to create durable dimples, it may be better to give up. Since this method has no scientific basis, it may simply not work for you.
Method 2: Use make-up
1. Smile to your teeth.
Look in the mirror and find the global area where you would like to see your fake dimples.
When you smile, the cracks in your lips should grow naturally. Your “dimples” should be just outside these hollows, starting about next to the area above the corners of your lips.
Make sure you smile broadly. You will get a better idea of where to make your dimples if you smile very hard because natural dimples are created when you make a big smile and not a shy little smile. You will be able to see where natural dimples are located.
This method is suitable when you want to take a picture. If you walk down the street like this, you won’t look natural at all.
2. Draw a dot with an eyeliner.
Use a dark brown eyeliner or eyebrow pencil to place a small dot at the top of the area where you will want to draw your dimple. Dimples are usually rounded lines or shapes.
It is best to use dark brown, as it blends more naturally with the color of the skin. Avoid using black or colored eyeliner.
3. Draw a small crescent moon on your cheek.
Release your mouth. Draw a small, slightly curved line starting at the point you drew. Use the same eyeliner or eyebrow pencil you used for the point.
The line should not be more than 2.5 cm below the point. It should be just slightly curved, less than the rounding of a fingernail.
4. Smooth and redraw if necessary.
Once you have drawn your dimples, you should use makeup to give them an elegant and natural appearance. Using your fingers or a stick to blur the line so that it blends into your natural skin color, rubbing up and down rather than from left to right.
It is possible that a single application is not enough to create a sufficiently dark line. You may need to draw and fade again, several times in a row.
Image intitulée Hint for a Kiss from a Guy Step 7
5. Smile to check the result.
Look in the mirror and ask yourself the following questions. Do dimples seem natural to you? Aren’t they too obscure or clear? Do they look the same when the light is different? If you don’t like the position of your dimples, clean and start again.
Method 3: Make a piercing in the cheek
1. Go to a professional.
Piercings are always a risk to your health. Don’t try to get a piercing at home. To minimize the risk of infection or complications, go to a qualified and reputable professional.
You should know that the majority of professional drillers will refuse to pierce the cheeks of an individual under the age of 18, even with the permission of the parents.
Many professional piercers advise the 12th-increasing of cheek piercing, regardless of age. The piercing of the ears and nose only passes through the skin and cartilage, while the piercing of the dimples passes through the muscles. As a result, the risk of damage to the nervous system and other complications is higher.
2. Clean the area properly.
The outside of the cheek should be cleaned with antibacterial soap, an alcohol-soaked sterilized wipe or any other sterilization process to avoid possible complications and infections. A professional will normally have the cleaning equipment available and will do so before starting the piercing.
The piercer may ask you to rinse your mouth with an antibacterial mouthwash to minimize the risk of piercing infection inside your mouth.
3. Make sure the tools are clean.
The needle should be cleaned with an antibacterial solution. The needle must also be heated before use to sterilize it. It must also be very sharp so that it crosses the cheek quickly. A pro driller will take care of that. The needle used for piercing should always be sterilized. If you have any doubts, abstain and go to another driller.
The needle must be heated before starting the operation.
The piercer’s hands should also be thoroughly cleaned with antibacterial soap. The piercer may wear disposable gloves.
The jewel must also be cleaned in an antibacterial solution.
4. Get pierced.
The piercer will use the needle to quickly pierce the exact area where the natural dimples should be. Once the hole is created, the piercer must immediately apply the jewel and then clean the area with an antibacterial product.
5. Apply the appropriate treatment after you have been pierced.
You will certainly need to clean the pierced area with a saline solution several times a day until the piercing is healed. Ask the person who did the piercing for you to advise you and recommend solutions tailored to your skin.
The piercer may provide you with the saline solution, but if you don’t, you can make it yourself by mixing 1 tablespoon (5 ml) of salt with 250 ml of distilled water.
Apply the saline solution with a cotton swab. Stamp the area near the piercing and gently clean under the head of the piercing.
Avoid playing with your piercing during healing. You may transmit bacteria to the pierced area and the jewel may shift from the area initially pierced.
6. Leave the piercing in place for one to three months.
This is usually the time it takes for the piercing to heal. Your beautiful piercing must first heal before you can remove the jewel. If you remove it too early, your dimples could disappear and you will have done this for nothing. Wait at least 1 month and up to 3 months before removing the jewel.
As soon as you remove the jewel, your piercing will begin to close. Until the healing is complete, you will have two small holes in your cheeks. After healing, you will have two adorable “dimples” at the cheeks.
Make sure you are not allergic to the type of metal used to create your dimples. Some people are actually allergic to certain metals, usually economic metals.
Keep in mind that these “dimples” will be on your cheeks, no matter what expression your face is: whether you smile or not, they are almost permanent.
Advice
The dimples do give charm, but the important thing is to be yourself.
You are beautiful (or beautiful) without dimples, these are not essential.
You can use a bottle cap to suck your cheek inwards. But they won’t be natural dimples.
You can also use cosmetic surgery. Although it is not a “natural” method, it can be effective.
Warnings
Cheek piercings can cause unexpected long-term damage to your facial muscles. If you don’t treat them properly, it can also cause serious infections. Do not use this method if you are fully aware of the potential negative consequences.
This web site is really a walk-through for all of the info you wanted about this and didn’t know who to ask.